Relocation strategies
Finding your way across the mountains is usually relatively straightforward when the weather is good, but as soon as the cloud descends and the weather turns foul, then matters can take on a different complexion altogether. At these times a moment's inattention can leave you feeling you are lost. Actually, it's wrong to use the word 'lost' because it has a 'final' ring about it and suggests you may never be found again! Better to think of yourself as temporarily misplaced and that you will, eventually, find your way back home.
So, what do you do if you're unsure of where you are? Well, there are a number of different tactics you can use and it's a good idea to know several of them. The overriding principle is to tackle the problem in a structured, methodical manner and certainly try to stay calm. Here's what to do. Think of three steps.
Step 1
Don't panic! It's easy to get alarmed because it can be quite unnerving to suddenly find that you don't know where you are. If the weather is poor and daylight hours are limited, this compounds the problem. Stay calm and don't do anything rash. Most important, don't simply start walking in different directions changing bearings every minute or two in the hope that things will be sorted. This strategy rarely works. You need to tackle the problem in a more controlled manner. So, stop and consider your situation and begin to gather some information. In other words, do a bit of research.
Step 2
i. If you think the cloud will lift then stay put and wait a while. If the cloud base is rising and falling regularly then you may not have to wait too long to see where you are. You may spot a distant peak that you recognise. Take a bearing on it and this can give you a fix on the map. However, typically when the cloud descends it tends to stay there longer than you have time to wait.
ii. Work out how long you've been walking since you last knew where you were. You can use Naismith's rule to estimate how far you have travelled from that point (see Estimating Distance Travelled).
iii. Think about any distinctive features you have passed since that point. For example, was there a stream junction or a knoll or steep section of ground? Perhaps you made a sharp turn along a ridge. Have you been travelling steadily uphill or perhaps downhill since your last known position? Was the ground sloping down to the left? Look at the map and you may spot one of these features. This may help narrow down your likely position.
iv. If you have been walking along a linear feature such as ridge or forest edge then take a bearing along that feature. You may be able to spot this feature on the map by comparing 'like with like'.
v. If you can see a couple of identifiable features (perhaps briefly as the cloud lifts) then take a bearing on each, adjust for the magnetic variation, and plot them on your map. Where the two lines intersect should tell you where you are. If the lines are at right angles then a more accurate fix can be gained and if you can use three features this should enable a very accurate fix. This technique is known as a resection but, in truth, it is rarely used since if you're able to identify a number of features around you then visibility is probably so good that you are unlikely to be mislaid in the first place. It's worth noting that if you are on a linear feature such as a ridge or stream then you can use this technique to judge your location with only a single reference point. Quite simply, your location is where the plotted line intersects the linear feature
vi. If you have a GPS receiver you should be able to gain a grid reference of your current location. But you need to be mindful of its accuracy especially when located next to a crag, in a deep sided valley or forest edge where reception may be poor. It's important not to rely totally on the technology because it can sometimes let you down.
vii. If you are with other people then speak to them. They may have observed something you missed or have a clearer idea about your current location.
Step 3
Having gathered as much information as possible then you need to plan what to do and take action. That plan has to be controlled and involve actions that can be retraced should they not work out. This is what you can do.
i. Decide to walk in a given direction on a bearing you think will take you to your next attack point. Work out the bearing and keep to it. Record the time you started walking and keep a note of how long you travel. Before you set off work out from the map exactly how the land should change as the leg unfolds. For example, you may expect the ground to descend for a distance of 200 metres then rise about 50 metres in height to a knoll before it starts to fall steeply. You may expect to hear the sound of a stream to your left as the ground flattens and becomes boggy. If your expectations are not realised then you can return to your position by reversing the bearing and recording walking time. It is important to check your observations as you walk against details on the map. If the two sources of information line up then you're on your way to determining your location.
ii. Similar to the last technique but instead of walking in the direction you had originally planned to go, take a bearing roughly at right angles and walk for say 200 metres in a straight line. Keep a note of the time or, better still, pace count so that you can return to your exact starting point if needs be. As you walk take a note of the terrain and how it changes. This may provide you with additional information that allows you to examine the map in greater detail. If you do this again in a different direction, you may accumulate sufficient information to pinpoint your position with accuracy. In any case, by referring to your map as each new bit of information arises you should be in a good position to establish your broad location.
iii. Depending on the degree of uncertainty, you may decide to aim for some kind of bounding or linear feature you know is in your broad area. This might be a forest edge, stream or path/track. Take a bearing to the feature and use it as a collector. Once you meet the feature you should be in a good position to work out where you are. This might involve moving along the feature for a short distance in order to gather more information.
iv. You may be able to retrace your route back to your last known position so that you can start all over again. If you are able to do this then make sure that the next time you set off, your navigation is accurate! On your way back you may cross a feature that gives you a good clue as to your whereabouts. If you have descended from an obvious summit then you can simply walk back uphill. If visibility is very poor then your body will tell you clearly whether or not you are climbing or descending. Once you arrive at the summit you can start to navigate again, but check the summit is the one you were at before.
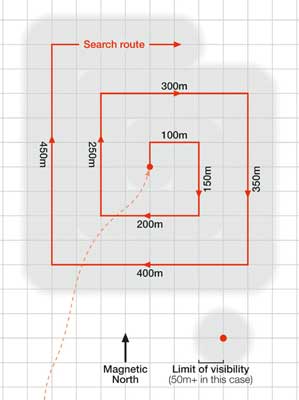
v. If these techniques fail then you can resort to carrying out a spiral search (see Diagram 1).
A spiral search involves an expanding series of right angle turns walking legs which are multiples of the limit of visibility. This allows an exhaustive search but can be very time consuming and inefficient. However, if carried out correctly it is guaranteed to provide you with important information. It is especially useful, if, for example, you are close to a particular feature such as a trig point of summit cairn.
vi. If it transpires that nothing works and night time is fast approaching then rather than stumbling in the dark with little sense of direction or knowledge of what terrain may unfold then you might consider staying fast on the mountain until daybreak and clear weather. If you have a mobile phone and a good signal then try to contact friends to let them know of your plans.
This page reproduced with the kind permission of the Mountaineering Council of Scotland (MCofS). They run a number of Mountain safety courses, Seminars and Lectures. You can join the MCofS here