Estimating Distance Travelled
It's obviously very important to know how far you have travelled from your last known point - this is done by Estimating Distance.
There are two tried and tested ways of estimating how far you have travelled. These are TIMING and PACING. Timing is probably the easiest to carry out but it is often the least accurate. Pacing is usually the most accurate but it can be laborious, especially over long distances. When the weather and conditions are difficult it is often wise to use both methods concurrently.
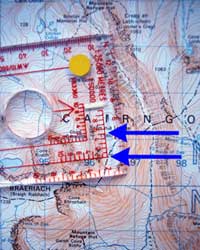
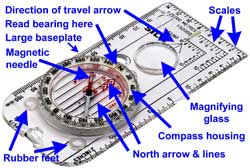
Before using either of these methods you will need to measure the distance on the map between your present location and the target you are walking to. Some people use the millimetres scale which runs alongside the compass baseplate (Figure 1) while others prefer to use one of the romers (Figure 2). Millimetres can sometimes be hard to distinguish especially in rain or snow.
On a 1:50,000 scale map, one millimetre represents 50 metres on the ground (an easy mistake is to count one millimetre as 100 metres). On a 1:25,000 scale map, one millimetre represents 25 metres on the ground. Using the compass romer may be clearer although some compasses don't have romers. Some compasses have removable scales for different maps.
Timing
This is based on knowing the speed at which you are walking and keeping a note of when you left your last known point. Walking speed varies and is dependent on a range of factors including fitness, weight of rucksack, length of journey, wind, conditions underfoot, slope angle (and closeness to pub closing time).
A formula for estimating the time required for a journey was published in 1892 by the renowned Scottish mountaineer, W.W. Naismith. There are numerous variations on this formula and enthusiasts will discuss at length the merits of different models. However, useful estimates can be made without going into great detail and most people manage with just one or two versions of Naismith's original calculations.
The simplest formula combines the horizontal distance with the height gained. Allow 5 kilometres per hour on the flat plus 10 minutes for every 100 metres height gain. Most reasonably fit people can maintain this speed throughout a day in the hills (provided there aren't any particular difficulties) but remember that it doesn't allow for rests or stops. "Naismith's" is a valuable navigation aid and also a useful way of working out how long your entire route will take.
To use this formula for short navigation legs, break it down to 1.2 minutes per 100 metres horizontal distance and 1 minute for every 10 metres of ascent. You can only travel at the speed of the slowest person and so you may need to use a slower formula such as 4 kph which is calculated at 1.5 minutes per 100 metres. When going gently downhill, it is best to ignore the height loss and just use the horizontal component of the formula. When descending steep ground which will slow your rate of travel a rough estimate can be used - allow 1 minute for every 30 metres of descent, although this is only an approximation.
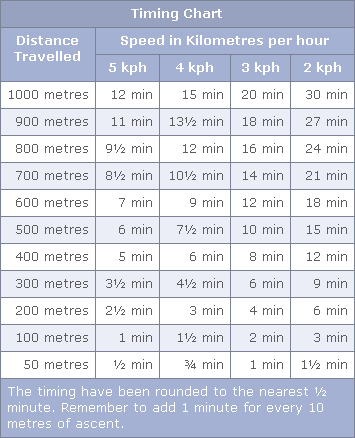
Using a Timing Chart (Figure 3) for the horizontal component makes the calculations easy although many people prefer to work it out mentally. Remember to add 1 minute for every 10 metres of ascent.
Working out timing calculations mentally becomes straightforward with practice:-
a. Measure the distance and allow 1.2 minutes for every 100 metres. An easy way to work this out is to use the 12 times table and move the decimal point forward. For example:-
- 300 metres
3 x 12 = 36 = 3.6 minutes
Round off to the nearest half minute = 3½ minutes OR - 650 metres
6 x 12 = 72 = 7.2 minutes
Round off to the nearest half minute = 7 minutes
Add ½ minute for the extra 50 metres = 7½ minutes
b. On an O.S. 1:50,000 or 1:25,000 scale map, count the number of contours and allow a minute for every contour. Remember that every fifth contour is a thick line and so you can count the thick contours in multiples of five to work out the total height gain (on a Harvey Superwalker 1:25,000 scale map the contour interval is 15 metres and so you will have to work out the total height gain and then allow 1 minute for every 10 metres of ascent).
Add (a) and (b) together and you have an estimate of how long it will take to cover the ground.
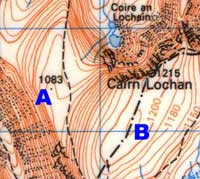
Figure 4 provides an example:-
From A to B
- Distance 850 metres
- 850 metres = 8 x 12 = 96 = 9.6 minutes
Round off to the nearest half minute = 9½ minutes
Add ½ minute for the extra 50 metres = 10 minutes
- Height gain 130 metres (13 contours, including the one which encloses the 1083 spot height)
1 minute for every 10 metres (or for every contour if using this map) = 13 minutes - Total time from A to B = 10 + 13 = 23 minutes
None of this is of any use if you don't have a watch. It is useful to have a stopwatch facility so you don't have to remember the time at the start of each leg. Most high street jewellers sell inexpensive digital watches which have a stopwatch facility (about £13).
Pacing
Pacing is often more accurate than timing but it does require concentration. An average stride takes about 60 double paces per hundred metres (a double pace is also known as a Roman Pace - hence the word "mile" which originated from a thousand Roman paces). You can find out your own individual pacing figure by measuring out 100 metres and then seeing how many double paces you take to cover the distance or you can do it on the hill between known points on relatively flat terrain.
Going up or down hill or walking on rough ground or in deep snow can alter the number of paces you take. You can estimate how many extra paces you need to take to complete 100 metres at the end of every 60 double paces. It is best to measure the distance in hundreds of metres rather than by working out the total number of paces needed for a particular navigational leg i.e. if the target is 450 metres away and your personal pacing figure is 62, then count 62 paces for four times (which gives you 400 metres) and then add the final 31 paces.
It is useful to have a way of remembering how many hundreds of metres you have paced - it's easy to forget especially if someone asks you a question halfway through the leg. Silva make a counter which fits on the side of your compass or you can use cord grips as counters on the compass lanyard.
Don't always expect your timing and pacing calculations to take you right to the spot you are heading for - look at the ground around you and compare it with the contours on the map. Can you find anything that doesn't fit in? If so, be tenacious about finding out why it doesn't fit. Look for other features which do make sense.
This page reproduced with the kind permission of the Mountaineering Council of Scotland (MCofS). They run a number of Mountain safety courses, Seminars and Lectures. You can join the MCofS here