Taking and Following a Compass Bearing
The previous articles dealt with Setting the Map and Contour Interpretation. Using these two skills often means that you don't need to use your compass very much but there will be times when good compass skills are essential. The skills described in this article should not be used in isolation from those shown in the previous two articles and the forthcoming ones. It is not a good idea to simply set a bearing on your compass and head off across mountain country without incorporating all the skills which the other articles deal with (e.g. setting the map, contour interpretation, estimating distance, route choice). Build up your compass skills progressively on paths and other prominent linear features which provide feedback about the accuracy of the course you are following.
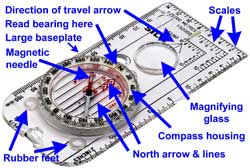
The important features of a compass for mountain navigation are shown in Photo 1:
- Large baseplate ‐ so you can take bearings between places several kilometres apart and also to provide a definite "direction of travel" in your hand.
- Magnifying glass ‐ even if your vision is perfect, you need this for seeing fine detail and for clarity in rain and snow.
- Scale or Romer for measuring distances on 1:50,000 and 1:25,000 scale maps.
- Rubber feet for gripping the map case when taking bearings.
- Useable with mitts or gloves - including being able to rotate the compass housing.
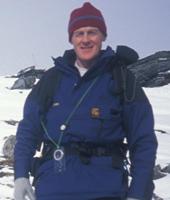
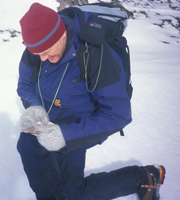
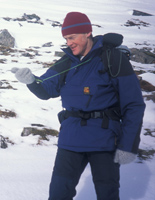
A compass like this performs two functions ‐ it is both a magnetic compass and a protractor for taking bearings. You need to attach your compass so that you can leave go of it without losing it and also use it to take bearings from the map and hold it up when following a bearing. A simple and effective method which can be used with any combination of clothing or equipment is a long cord which goes over one shoulder (Photo 2). When using the compass for taking or following bearings, you can slip your arm through the loop (Photos 3 & 4).
There are two main factors required for effective compass work:-
- Taking the correct bearing from the map.
- Following it accurately on the ground.
Taking the correct bearing from the map
Any inaccuracy in taking the bearing will be magnified when you follow it on the ground so it is important to be as precise as possible. It's good to have a firm surface to lay the map on so you can hold the compass firmly in place - sitting down or using one knee works well (Photo 3).
Before placing the compass on the map, estimate what the bearing will be (from your location to the feature you want to go to). No need to do this in degrees, the cardinal points will do, i.e. North; South; East; West or NW; SE etc. This will alert you to the embarrassing and potentially serious error of lining up the compass in the wrong direction or along the wrong grid lines - getting into this habit will mean that your bearings are always double-checked.
Place the compass on the map with the Direction of Travel arrow pointing in the direction you want to go and then line up the edge of the baseplate with your location and the feature you want to go to (the magnetic needle has nothing to do with taking a bearing from the map and you don't necessarily need to be anywhere near the area covered by the map when you take a bearing). You can also use the lines which run parallel with the edge of the baseplate - it is often easier to see the detail on the map more clearly by using these lines (Photo 5).
Once you have lined up the two points, press the baseplate firmly down on to the map to keep it in place (this is why it is useful to use your knee). Rotate the compass housing so that the north arrow points to north on the map (ignore the magnetic needle). Make sure the lines within the compass housing are parallel to the eastings (the eastings are the Grid Lines which point north - they are called the eastings because they are numbered from west to east). Check that you have accurately lined up:-
- Your location on the edge of the baseplate (or a line parallel to the edge of the baseplate)
- The feature you want to go to on the edge of the baseplate (or the same parallel line as in (i) above)
- The lines within the compass housing are lined up with the eastings, pointing to north on the map
You now have an accurate Grid Bearing. Take the compass off the map and note what the bearing is. You can read it at the cursor which is in line with the Direction of Travel arrow. Be careful not to dislodge the bearing by allowing the compass housing to rotate unintentionally.
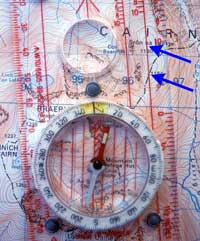
Before following the bearing on the ground you will need to adjust it for the Magnetic Variation. This variation changes over the years. The area around Ben Nevis presently has a variation of just over 3 degrees while the Cairngorms are just under 4 degrees. It is not practical to set your compass bearing to more than one degree of accuracy so for much of Scotland in 2009 you can use 3 degrees (confirm that you are using the correct variation by checking the details on the map). To convert a Grid Bearing to a Magnetic Bearing you need to add the 3 degrees. Most compasses which are used for mountain navigation have an increment of two degrees on the compass housing - so add one and a half increments. Finally check that the bearing you have is similar to the rough estimate which you took at the beginning - this is your double check.
Following the bearing on the ground
Hold your compass in front of you with the Direction of Travel arrow pointing in whichever direction you happen to be facing. Keep holding the compass in front of you and walk your body around until the north end of the magnetic needle coincides with the north arrow in the compass housing (the north end of the magnetic needle on your compass will probably be coloured red and some compass needles also have "N" on the needle). It is your body that turns - not the compass baseplate. The Direction of Travel arrow now "does what it says on the tin" - tells you which way to go.
How to follow the bearing:-
i. The least accurate way to follow the bearing is to simply line up the needle as described above and "walk on the needle" i.e. you are only using the Direction of Travel arrow to keep you on the right bearing. It is possible to be accurate with this method but it does require practice and most people have a tendency to drift off to one side or the other (personal knowledge of your "drifting tendency" is useful). You need to hold the compass centrally in front of your body with the baseplate horizontal and positioned so that you can see the alignment of the magnetic needle whilst at the same time look along the Direction of Travel.
The next paragraph describes a useful practice exercise which is great fun and doesn't take long:-
Go to a fairly large area of flat ground such as a football pitch - take your compass and a couple of black plastic dustbin liners which will go over your head. You need to take a friend to make sure you don't walk into anything or have any difficulty with the bin liners. Mark your start point and, with the bin liner over your head, set the compass to north and follow the bearing for 25 double paces. Then set the bearing to east and follow this for another 25 double paces. Continue with south and then west so that you have walked a square. If you have followed the bearings accurately and have been consistent with your pacing you will finish up at the start point.
ii. The most accurate way to follow the bearing is to identify features on the ground which are on your direction of travel. This obviously requires some visibility but even in relatively poor visibility there will often be sufficient features which you can still see. The features can be quite close to you, maybe 25 metres. Holding the compass so that you can look along the baseplate in the direction of travel and at the same time confirm that the magnetic needle is lined up with the north pointer, find a feature which lies on the bearing. It may be a rock, a clump of heather or a change in the appearance of snow or ice cover. Once you have identified the feature there is no need to use the compass again until you have reached it. You can also take any route around obstacles to get to the feature. It is essential to maintain your fix on the feature (it may change in appearance as you get nearer). If you lose sight of it then use your compass to choose another feature. The features you choose need to be between you and the final target you are heading to. It's no use choosing something beyond your final target.
iii. In a white-out or when there are no features visible to line up on, you either need to "walk on the needle" as in (i) above or, use a companion to STEER as follows:-
Steering with two people
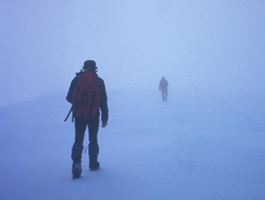
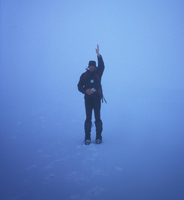
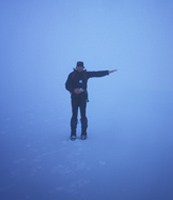
Both of you must have compasses with the correct bearing set. One person walks in front within the limit of visibility and follows the bearing. The rear person uses the front person as a "feature" to line up on (Photo 6). It will be clear to the rear person whether or not the front person is walking on the bearing or is drifting off to one side. Every hundred metres, the front person turns around for clarification from the rear person. If all is well, the rear person puts an arm up vertically (Photo 7). If drifting has occurred, the rear person points in the direction required to come back on course (Photo 8). This method is effective and doesn't slow the overall speed down very much.
These methods show how to take and follow a compass bearing accurately. There are times when absolute precision is not necessary because you are following a linear feature on the ground such as a ridge or a stream. It is still good practice to take a rough bearing and to use the compass to keep a general check on your direction. This will confirm that the feature you are following is still the correct one and could prevent a major navigational error.
Of course, following the bearing isn't the end of the story - you also need to know how far you have travelled. This is discussed in Estimating Distance.
This page reproduced with the kind permission of the Mountaineering Council of Scotland (MCofS). They run a number of Mountain safety courses, Seminars and Lectures. You can join the MCofS here
